WebサーバーのSSL設定について、勉強したメモ。OSはCentOS6.4。簡易手順ですが、
|
1.サーバーの秘密鍵を作成 |
|
2.CSRの作成 |
|
3.自分でCAを構築 |
|
4.CSRをCAに送る |
|
5.サイト証明書を発行 |
|
6.Apacheの設定、再起動 |
|
7.確認 |
# ### 1. SSLモジュールをインストール
# yum install mod_ssl

# ### 2. サーバ秘密鍵を作成
# cd /etc/pki/tls/certs/
# ls
Makefile  ca-bundle.crt  ca-bundle.trust.crt  localhost.crt  make-dummy-cert
# make server.key
###サーバの秘密鍵のパスフレースを設定する
# ls
Makefile  ca-bundle.crt  ca-bundle.trust.crt  localhost.crt  make-dummy-cert server.key

# ### 3. CSRを作成
# make server.csr
……
Common Name (eg, your name or your server's hostname) []:oyt.otorchin-test.com
……
# ls
Makefile  ca-bundle.crt  ca-bundle.trust.crt  localhost.crt  make-dummy-cert  server.csr  server.key

# ### 4. CA構築
# /etc/pki/tls/misc/CA -newca

# ### 5. CSRをCAに送る
# cp /etc/pki/tls/certs/server.csr /etc/pki/CA/newreq.pem

# ### 6. サイト証明書を発行
# cd /etc/pki/CA
# /etc/pki/tls/misc/CA -sign ### newreq.pemのディレクトリで実行すること
…
-----END CERTIFICATE-----
Signed certificate is in newcert.pem

# ### 7. ディレクトリ作成とパーミッション設定
# mkdir /etc/httpd/conf/ssl.key
# chmod 700 /etc/httpd/conf/ssl.key
# mkdir /etc/httpd/conf/ssl.crt

# ### 8. サーバ秘密鍵の設置
# cp /etc/pki/tls/certs/server.key /etc/httpd/conf/ssl.key/
# chmod 600 /etc/httpd/conf/ssl.key/server.key

# ### 9. サイト証明書の設置
# cp /etc/pki/CA/newcert.pem /etc/httpd/conf/ssl.crt/server.crt

# ### 10. Apacheの設定と再起動
# vi /etc/httpd/conf.d/ssl.conf
SSLCertificateFile /etc/httpd/conf/ssl.crt/server.crt
SSLCertificateKeyFile /etc/httpd/conf/ssl.key/server.key

# service httpd start
httpd を起動中: Apache/2.2.15 mod_ssl/2.2.15 (Pass Phrase Dialog)
Some of your private key files are encrypted for security reasons.
In order to read them you have to provide the pass phrases.

Server lpic303-CentOS6:443 (RSA)
Enter pass phrase:

OK: Pass Phrase Dialog successful.
                                                           [  OK  ]

# echo "これはSSL動作確認用のテストページ" > /var/www/html/index.html
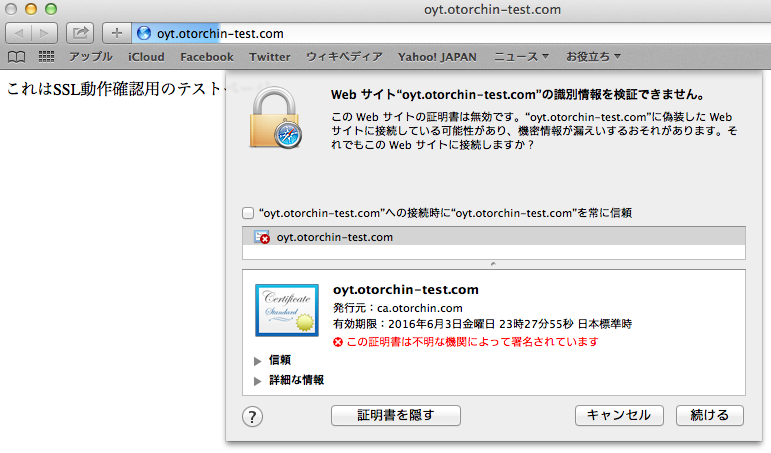
証明書インストール前の確認
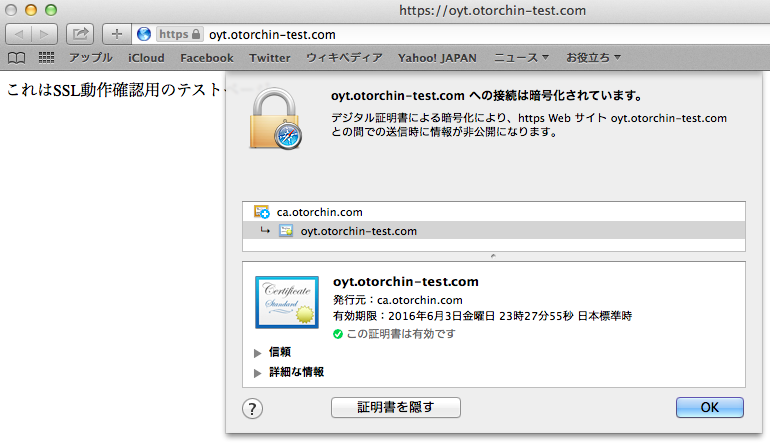
証明書インストール後の確認